Xamarin.Forms: Quick and easy custom picker with a more traditional look
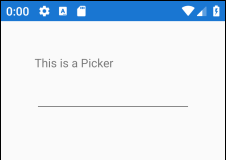
Xamarin.Forms has a control called a Picker, it’s practically equivalent to a: ListBox, <Select> or a generic drop-down list. Here is one living in Android (9.0 Pie – API 28 emulator). I don’t have an iOS device (or simulator) on-site but it looks the same.

Here’s my problem, it sucks. It’s a freakin’ nondescript line.
For this post I’m going to build a ContentView to give the Picker a more traditional look. A ContentView is for all intents and purposes a user/custom control. The stock Picker is on the left; my custom Picker is on the right.

This is a quick and dirty guide, you should tweak the code to your own requirements. The source code is available at the end.
Let’s get started.
1. Remove line (custom renderer)
I’m going to use a custom renderer (one for each platform) to remove the line. You can skip this if you want to keep the line.
Create a new control BorderlessPicker inherited from Picker in the main project (“App1/BorderlessPicker.cs“).
namespace App1
{
    using Xamarin.Forms;

    public class BorderlessPicker : Picker
    {
        public BorderlessPicker() : base()
        {
        }
    }
}
Create a custom renderer BordlessPickerRenderer in the Android project (“App1.Android/BordlessPickerRenderer.cs“).
using Android.Content;
using App1;
using App1.Droid;
using Xamarin.Forms;
using Xamarin.Forms.Platform.Android;

[assembly: ExportRenderer(typeof(BorderlessPicker), typeof(BordlessPickerRenderer))]
namespace App1.Droid
{
    public class BordlessPickerRenderer : PickerRenderer
    {
        public BordlessPickerRenderer(Context context) : base(context)
        {
        }

        protected override void OnElementChanged(ElementChangedEventArgs e)
        {
            base.OnElementChanged(e);

            if (e.OldElement == null)
            {
                Control.Background = null;
            }
        }

    }
}
Create a custom renderer in the iOS project (“App1.iOS/BordlessPickerRenderer.cs“).
using App1;
using App1.iOS;
using UIKit;
using Xamarin.Forms;
using Xamarin.Forms.Platform.iOS;

[assembly: ExportRenderer(typeof(BorderlessPicker), typeof(BorderlessPickerRenderer))]
namespace App1.iOS
{
    public class BorderlessPickerRenderer : PickerRenderer
    {
        protected override void OnElementChanged(ElementChangedEventArgs e)
        {
            base.OnElementChanged(e);

            if (Control == null)
            {
                return;
            }

            Control.Layer.BorderWidth = 0;
            Control.BorderStyle = UITextBorderStyle.None;
        }

    }
}
2. Create down-arrow graphic
Create (or procure) a graphic for your “down-arrow”. I made one with Inkscape but you can find one online.
3. LessSuckyPicker ContentView (XAML)
I’m using a composite of other controls to make this ContentView called “LessSuckyPicker”. This is essentially the BorderlessPicker and a Button in a Grid.

This is the XAML.
<?xml version="1.0" encoding="UTF-8"?>
<ContentView xmlns="http://xamarin.com/schemas/2014/forms" xmlns:x="http://schemas.microsoft.com/winfx/2009/xaml"
             xmlns:app1="clr-namespace:App1" x:Class="App1.LessSuckyPicker">
  <ContentView.Content>
        <Frame BorderColor="Black" Padding="0" Margin="0, 10, 0, 0" CornerRadius="0">
            <Grid>
                <Grid.ColumnDefinitions>
                    <ColumnDefinition Width="*" />
                    <ColumnDefinition Width="1" />
                    <ColumnDefinition Width="48" />
                    <ColumnDefinition Width="1" />
                </Grid.ColumnDefinitions>
                <Grid.RowDefinitions>
                    <RowDefinition Height="50" />
                </Grid.RowDefinitions>

                <app1:BorderlessPicker x:Name="borderlessPicker1" Grid.Row="0" Grid.Column="0" HorizontalOptions="FillAndExpand" VerticalOptions="Center" Margin="10, 0, 10, 0"  />

                <BoxView Grid.Row="0" Grid.Column="1" HorizontalOptions="FillAndExpand" VerticalOptions="FillAndExpand" BackgroundColor="Black"  />

                <Button Grid.Row="0" Grid.Column="2" x:Name="button1" Image="LessSuckyPicker.png" VerticalOptions="Center" HorizontalOptions="Center" BorderRadius="0" BorderWidth="0" BackgroundColor="Transparent" Margin="0" WidthRequest="48" />

            </Grid>

        </Frame>
  </ContentView.Content>
</ContentView>
4. Class
Finally we add an event on the button to trigger the Picker and pass-through some public properties.
using System;
using Xamarin.Forms;
using Xamarin.Forms.Xaml;

namespace App1
{
    [XamlCompilation(XamlCompilationOptions.Compile)]
    public partial class LessSuckyPicker : ContentView
    {
        public LessSuckyPicker()
        {
            InitializeComponent();

            button1.Clicked += button1_Clicked;
        }

        private void button1_Clicked(object sender, EventArgs e)
        {
            borderlessPicker1.Focus();
        }

        public BorderlessPicker Picker { get => borderlessPicker1; set => borderlessPicker1 = value; }

        public string Title { get => borderlessPicker1.Title; set => borderlessPicker1.Title = value; }

        public System.Collections.IList ItemsSource { get => borderlessPicker1.ItemsSource; set => borderlessPicker1.ItemsSource = value; }

    }
}
That is it.
I hope someone finds this useful.
Social Media
Categories
Tags
Post Information
Posted on Mon 14th Oct 2019
Modified on Sat 5th Aug 2023